LPWAN Meshes: MeshCore - Moving Beyond the Ad-Hoc
While Meshtastic serves as a solid introduction to LPWAN mesh networking, MeshCore represents a move toward more structured networks, particularly when the limits of ad-hoc flooding become a bottleneck. It addresses the “airtime” congestion common in simpler protocols, offering a far more robust path for community-scale infrastructure where a “best effort” approach isn’t enough. MeshCore is built for managed deployments and regional sensor networks where reliability and structured routing are the priority.
LPWAN Meshes: MeshTastic - The Gateway Drug
For many new to LPWAN mesh networking, MeshTastic often appears as a starting point due to its affordability and active community. It can get you from zero to sending a basic mesh message relatively quickly. For some, it may seem like a convenient entry into mesh networking.
In this post, I’ll dive into what makes MeshTastic tick, where it excels, and where it falls short based on my own experience using it across various scenarios.
LPWAN Meshes: Choosing the Right Technology
Long-range Sub-GHz wireless mesh networks have become essential for modern communication, particularly in remote areas where traditional infrastructure is impractical or impossible. By utilising lower frequencies (typically below 1 GHz), Sub-GHz networks can achieve remarkable range, low power consumption, and the ability to penetrate obstacles such as buildings and dense forests.
These characteristics make Sub-GHz mesh networks ideal for applications in IoT, outdoor communication, emergency response, and industrial networks. But with numerous technologies now available, choosing the right one for your needs can be challenging.
From Consumer to Creator: A Practical Guide to Community Telecoms
In the first two parts of this series, we explored why community telecoms matter and how resilient mesh networks can save lives during emergencies. Now comes the question I’m asked most often: “That sounds great, but how do I actually build one?”
This is the knowledge I wish I’d had when I started.
If my journey from those early Austrian tele-working centres to deploying mesh networks across remote Australian properties has taught me anything: the hardest part isn’t the technology: it’s overcoming the psychological barrier between “consumer” and “creator.” We’ve been conditioned to believe telecommunications infrastructure is something large corporations build, not something communities can create themselves.
Working with Siemens IoT2000 series from Linux
The Siemens IoT2000 series has been a very interesting development from Siemens and it’s really encouraging to see the use of Open Source in the Automation sector definitely on the increase. And that can only be a good thing for developer productivity. Seeing a different IDE for each manufacturer of a PLC invokes some nasty memories of last century web-application development…
 Unfortunately, all the documentation for these units still assumes a Windows PC. And since I have not really been using a physical Windows machine for 10+ years now, that is really slowing things down. For the last few I didn’t really have to fall back to a VM, largely due to the fact that in web-development nobody cares about OS any longer. But I have a feeling that shifting my focus to the IIoT space this VM will get a bit more useful as some of these manufacturers don’t even bother with anything but Windows and are challenged enough to keep up with Windows upgrades.
Setting up MultiTech LoRaWAN gateway on Ubuntu
As the convener for the Adelaide community of The Things Network, I am frequently setting up Multitech Conduit Gateways. Depending on your PC or notebook hardware you might have some problems with the Exar USB-UART driver on Linux.
Here are the steps to getting this unit setup from an Ubuntu (should work for any other Linux distro) machine.
lsusbShould show something like this:
Bus 002 Device 006: ID 04e2:1410 Exar Corp. XR21V1410 USB-UART IC
Moving to KVM virtual machines
Installing VirtualBox is getting increasingly painful on Ubuntu due to the problems with UEFI Secure Boot and the VirtualBox kernel modules. Another reason for an alternative is that running VirtualBox VM’s completely in the background is not as straightforward as it could be.
From the available alternatives I looked into (VMWare, Xen & KVM) it was KVM that fitted my needs (casual VM usage with mostly headless VM’s for testing purposes). Main reasons:
Microchip LoRaWAN Development Utility on Ubuntu
Having just wasted a few hours on getting this Java software running on Linux I am documenting this for future reference and hopefully saving other LoRa / TTN folks some time.
Prerequisites
Install a Java JDK + JavaFX. This should work with the default OpenJDK 8 or 9 which comes as part of the Ubuntu repositories. I ended up installing Oracle JDK 8 as well as I thought the error might be related to OpenJDK.
Display your Flickr Favourites as Screensaver Slideshow
Install XScreenSaver and remove Gnome default
sudo apt remove gnome-screensaver
sudo apt install xscreensaver xscreensaver-gl xscreensaver-gl-extraRun the Screensaver UI and configure
In the “Advanced” section enter your Flickr RSS URL in “Choose Random Image”
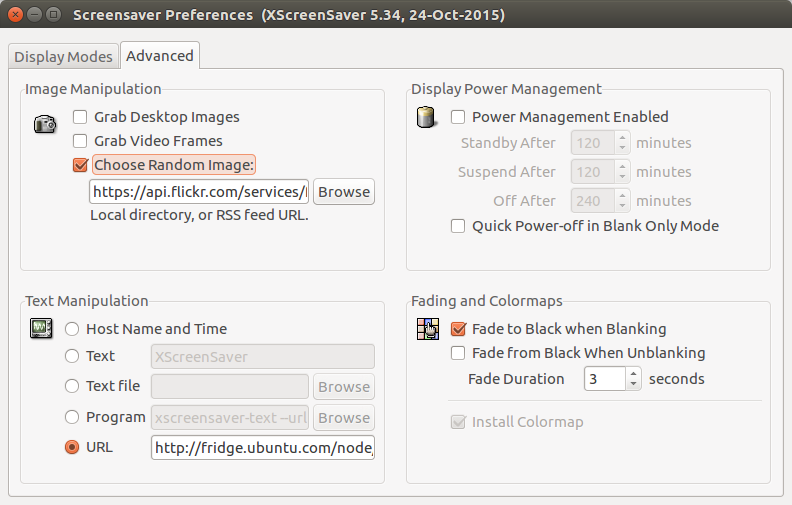
https://api.flickr.com/services/feeds/photos_faves.gne?id=YOURFLICKRUSERID (replace with your Flickr User ID)
Create a systemd user service to autostart
mkdir -p ~/.config/systemd/user/
vim ~/.config/systemd/user/xscreensaver.service[Unit]
Description=XScreenSaver
[Service]
ExecStart=/usr/bin/xscreensaver -nosplash
[Install]
WantedBy=default.targetStart and enable systemd user service
systemctl --user enable xscreensaver
systemctl --user start xscreensaverTo copy the settings (including RSS URL) onto other PC’s or re-install it might be a good idea to backup or copy the contents of ~/.xscreensaver
GrovePi Zero - connecting your IoT sensors
I recently purchased a GrovePi Zero and expected this to be a reasonable straight forward way to connect Grove sensors to your Raspberry Pi, read sensor values via Python and pushing them upstream via MQTT. However the software side of things turns out anything but straight forward. Most of the suggestions on the Dexter Industries forum suggest to download some custom OS image – WTF? Hopefully this will save some people time to chase down the same rabbit holes…..
Set up a Raspberry Pi Zero headless
If you are using the GUI (Raspian full download) and want to connect your RPi Zero to a keyboard and monitor there are probably easier ways to do this. These notes are for people that want to use a headless (no monitor and GUI) setup ready to connect to your RPi after first boot via SSH from another terminal.

Connecting your LoPy to The Things Network in Australia
EDIT [2018-06-05]: I have updated the code with the Firmware 1.18.+ releases. The code is available at our Growing Data Foundation Github.
These notes are to assist Australian IoT enthusiasts to get started in connecting a LoPy to The Things Network as it is unfortunately (not yet) straight forward to make them work with the current AU-915 TTN Channel plans. As the initiator of the local Adelaide Community of The Things Network I have been experimenting with a number of devices to connect sensors to #TTNADL. One of my personal favourites is the Pycom LoPy as a nice middle-ground between capabilities and technical complexity.