Galaxy Nexus Firmware Upgrade on Ubuntu (manual)
As a Galaxy Nexus Owner I have been waiting for months for an OTA (over the air) upgrade to the factory installed Firmware (4.0.2). I am finally sick of waiting and complaining to Google (an absolute lost cause).
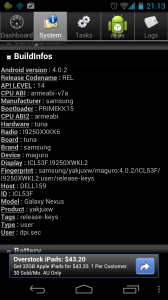
After some research it turns out that (contrary to popular opinion) not every unlocked Google Nexus actually has the ‘official’ Google Firmware. Some of them have a Samsung variant (WTF !?) of the firmware. Now I really don’t want to get off the technical topic, but I personally think that this means Google is misleading their most loyal customer base. The reason I chose a Nexus device over the (from a hardware perspective) superior HTC One X was the fact that they were supposed to have the official Google Firmware and I did not have to wait forever for bugfixes from the manufacturers.
There are a reportedly several different versions out there. Google’s ‘official’ build for the GSM version of the Galaxy Nexus is named ‘yakju’. Samsung builds ‘yakjusc’, ‘yakjuxw’ and ‘yakjuux’. While they appear mostly the same, only Google’s yakju build is likely to get updates as they happen. Go figure why there was a need for others … :(
To find out which version your Nexus uses you can use this key combination (in the phone app)
##4636##
or for a more permanent option grab “Android System Info” from the Google Market.
Disclaimer: this procedure obiously has the potential to ‘brick’ your mobile. Only attempt this if you are absolutely comfortable with flashing device firmware. Proceed at your own risk !!! If you decide to proceed – BACKUP YOUR DEVICE FIRST ! Check the documentation for ‘adb backup‘.
All the notes below are for GSM (HSPDA+) NEXUS (GT I9250 – maguro) devices !
Android SDK Install
The Android SDK can be downloaded from the Androide Site: http://developer.android.com/sdk/index.html)
Android Fastboot Mode
For all the following procedures to work the device needs to be in ‘Fastboot Mode’
How put your phone in fastboot mode:
- Power off the phone
- Hold the Volume Up Key + Volume Down Key pressed and at the same time press the Power button.
You should now see an Android robot with it’s body opened (see photo).
wget http://dl.google.com/android/android-sdk_r18-linux.tgz
tar -xzf android-sdk_r18-linux.tgz android-sdk-linux/tools/android update sdk –no-ui #test fastboot mode #this should show the serial number of the connected device cd android-sdk-linux/platform-tools/ fastboot devices
Adding the USB Driver definitions for the Galaxy Nexus
vim /etc/udev/rules.d/70-android.rules
#add this line: SUBSYSTEM==“usb”, SYSFS{idVendor}==“0bb4”, MODE=“0666”`
Unlocking the Bootloader
NOTE: This command will erase the whole device. Make sure backups have been taken before (check the ‘adb backup’ tool http://developer.android.com/guide/developing/tools/adb.html).
fastboot oem unlock
Flashing the new Firmware
The ‘factory images’ for Nexus devices can be found here: https://developers.google.com/android/nexus/images – make sure to choose the correct model. The commands below are for the European GSM/HSPDA+ version of 4.0.4 (yakju)
wget https://dl.google.com/dl/android/aosp/yakju-imm76i-factory-8001e72f.tgz
tar -xzf yakju-imm76i-factory-8001e72f.tgz fastboot flash bootloader yakju-imm76i/bootloader-maguro-primela03.img fastboot reboot-bootloader fastboot flash radio yakju-imm76i/radio-maguro-i9250xxla02.img fastboot reboot-bootloader fastboot -w update yakju-imm76i/image-yakju-imm76i.zip`
After the last step the handset will reboot and you should be presented with a Google “Stock” device and go through the normal Android setup wizard. As it should have been when I purchased this “Google” branded device in the first place – thank you Google (and of course SAMSUNG) for wasting my time !
If you want to lock your bootloader after the upgrade (not necessary) you can go into Fastboot Mode again and issue the following command:
fastboot oem lock
Comments
Be the first to comment! Reply to this post from your Mastodon/Fediverse or Bluesky account, or mention this post's URL in your reply. Your comment will appear here automatically via webmention.
Follow this blog on Mastodon at @gaggl.com@web.brid.gy or on Bluesky at @gaggl.com

