Paperless Office on a budget
sudo apt-add-repository ppa:rolfbensch/sane-git
sudo apt-get update
sudo apt-get install sane sane-utils imagemagick tesseract-ocr pdftk libtiff-tools libsane-extras exactimage wput
Install scanbuttond
Download the “Debian Experimental” package from http://pkgs.org/download/scanbuttond
sudo dpkg -i scanbuttond_0.2.3.cvs20090713-14_i386.deb
This step is only for the Fujitsu ScanSnap support. For other scanners you can probably install from the Ubuntu Repository
Scanner config
vim 40-libsane.rules
#add this line
ATTRS{idVendor}=="04c5", ATTRS{idProduct}=="11a2", ENV{libsane_matched}="yes"
Permissions
sudo adduser saned scanner
Useful command lines for troubleshooting
Since I had a few trouble getting this scanner to work properly I found the following commands highly useful in locating the issue.
Quick Adobe Reader install on Ubuntu 13.04
Whilst EVINCE is a very capable PDF Viewer, if you have a need to fill in editable PDF forms it is required to install the Adobe PDF Reader.
sudo add-apt-repository "deb http://archive.canonical.com/ precise partner"
sudo apt-get update
sudo apt-get install acroread
PS: If anybody is aware of an Open Source alternative to the Adobe Reader for editable form please leave a comment !
Installing Custom ROM on Galaxy S4 International from Ubuntu
Or as an alternative title “Liberating your Galaxy S4 Hardware from Samsung Bloatware”.
Unfortunately there is lots of (ad-infested) blogs and forums with dodgy pieces of information on this topic and I found it pretty hard to get descent concise information. So hopefully this might help some poor Linux User liberate their phone. Whilst this has been tested on a Samsung GT-I9505 S4 International LTE device (JFLTEXX series) it should be applicable to other similar Samsung phones that are not fastboot capable (ie. all but the Galaxy Nexus range).
SMS Gateway using Sierra Wireless USB Modem on Debian Wheezy
I have been planning to set up a SMS Gateway for sending and receiving SMS messages via a headless utility unit (Raspberry Pi) for a while. Since I had a leftover Sierra Wireless AirCard 880U from Telstra in Australia I wanted to re-purpose this unit with a spare SIM card. Unfortunately it was very hard to find any good setup manual for this particular combination and took some time to fiddle & debug. This is the working setup for future reference and hopefully it helps somebody.
Twitter RSS Feeds
Now that Twitter has totally killed their V1 API there is no official way to get Twitter feeds via RSS. Which is a real shame as RSS is a well accepted Open Standard for this type of information :-(

Creative Commons Attribution 2.0 Generic License (http://creativecommons.org/licenses/by/2.0/) by Jurgen Appelo```xml
Remove Ubuntu Webapps integration features
One of the most annoying features in Ubuntu from 12.10 onwards are the pesky notifications popping up asking if you want webapps support everytime you visit a supported webpage?
Whilst you can disable this in Firefox’s browser options: Firefox > Preferences > General: Uncheck “Prompt integration options for any website”.

However I prefer to remove the browser extensions entirely.
sudo apt-get remove xul-ext-unity unity-chromium-extension
NOTE: Take care – unfortunatly you can not remove the following as their removal will cause Unity to fail !
Quick ‘manual’ Eclipse install on Ubuntu
Since I always had trouble with the Eclipse version that is avaialable via the Ubuntu repositories I often need to install Elcipse on new machinery. Hence I am documenting the process for myself and hopefully it might help others as well.

Java dependencies install
sudo apt-get install openjdk-7-jre openjdk-7-jdk icedtea-7-plugin
Eclipse download
Note: download link needs to be updated – current as of 2014-01-27
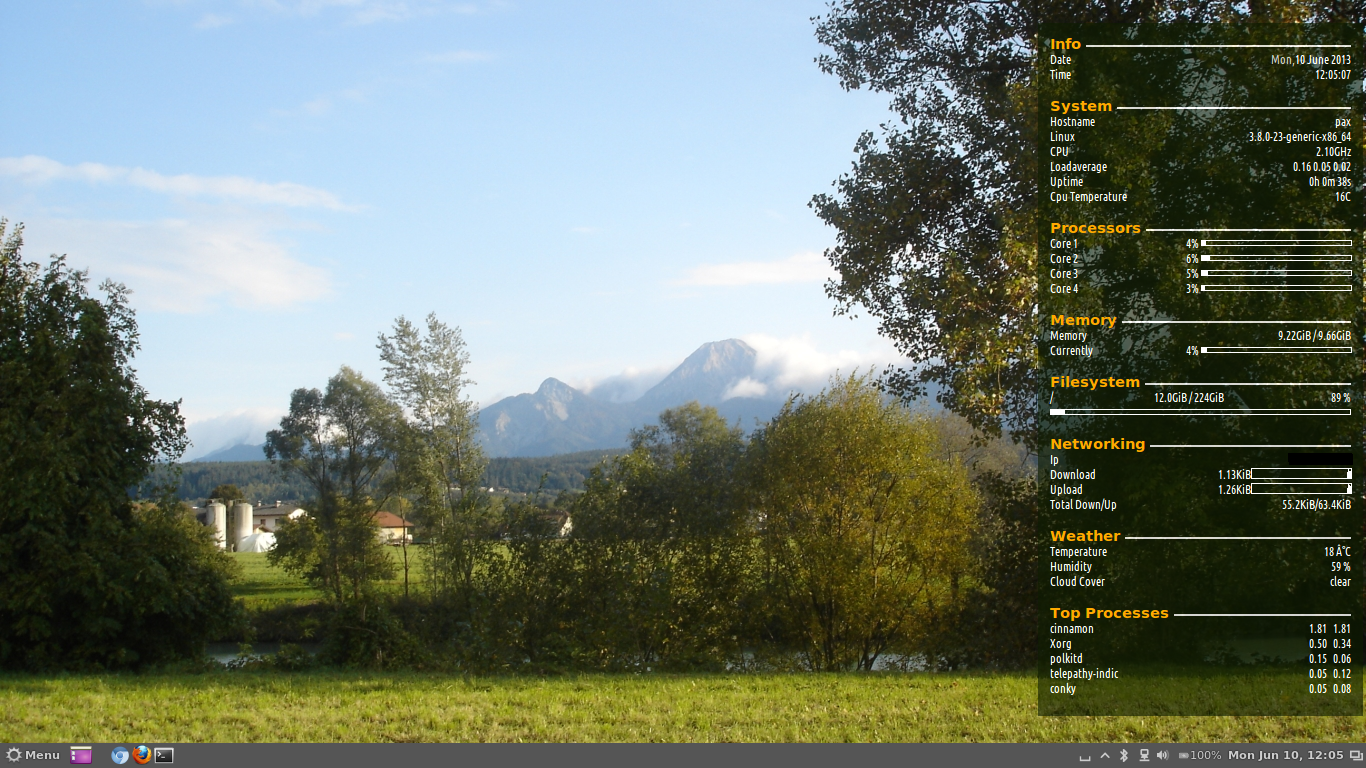
Simple conky system monitor configuration
Just a quick note on install and configuration of Conky.
Installation
sudo apt-get install conky conky-all hddtemp curl lm-sensors
sudo chmod u+s /usr/sbin/hddtemp
sudo sensors-detect
vim ~/.conkyrc
This is the content of my config file.
use_xft yes
xftfont Ubuntu Condensed:size=9
xftalpha 0.8
override_utf8_locale yes
update_interval 5.0
total_run_times 0
own_window yes
own_window_transparent no
own_window_argb_visual yes
own_window_argb_value 155
own_window_colour 081100
own_window_type normal
own_window_class conky-lgaggl
own_window_hints undecorated,below,sticky,skip_taskbar,skip_pager
#background yes
#out_to_console no
double_buffer yes
#max_user_text 32768
minimum_size 300
draw_shades no
draw_outline no
draw_borders no
draw_graph_borders yes
default_shade_color black
default_outline_color white
default_bar_size 150 5
default_gauge_size 20 20
imlib_cache_size 0
draw_shades no
alignment middle_right
gap_x 15
gap_y 15
border_inner_margin 10
no_buffers yes
uppercase no
cpu_avg_samples 2
override_utf8_locale no
default_color ffffff
color1 ffffff
color2 cccccc
color3 000000
color4 FFAA00
TEXT
${font UbuntuBold:bold:size=11}${color4}Info ${color2}${hr 2}${font}
${color1}Date ${alignr}${color2}${time %a,}${color}${time %e %B %G}
${color1}Time ${alignr}${color}${time %T}
${font UbuntuBold:bold:size=11}${color4}System ${color2}${hr 2}${font}
${color1}Hostname ${alignr}${color}${nodename}
${color1}${sysname} ${alignr}${color}${kernel}-${machine}
${color1}CPU ${alignr}${color}${freq_g}GHz
${color1}Loadaverage ${alignr}${color}${loadavg 1} ${loadavg 2} ${loadavg 3}
${color1}Uptime ${alignr}${color}${uptime}
${color1}Cpu Temperature ${alignr}${color}${acpitemp}C
${font UbuntuBold:bold:size=11}${color4}Processors ${color2}${hr 2}${font}
${color1}Core 1 ${alignr}${color}${cpu cpu1}% ${cpubar cpu1}
${color1}Core 2 ${alignr}${color}${cpu cpu2}% ${cpubar cpu2}
${color1}Core 3 ${alignr}${color}${cpu cpu3}% ${cpubar cpu3}
${color1}Core 4 ${alignr}${color}${cpu cpu4}% ${cpubar cpu4}
${font UbuntuBold:bold:size=11}${color4}Memory ${color2}${hr 2}${font}
${color1}Memory ${color}${alignr}${memeasyfree} / ${memmax}
${color1}Currently ${color}${alignr}${memperc}% ${membar}
${font UbuntuBold:bold:size=11}${color4}Filesystem ${color2}${hr 2}${font}
${color1}/ ${color}${alignc}${fs_used /} / ${fs_size /} ${color}${alignr}${fs_free_perc /} %
${color}${fs_bar 5,300 /}
${font UbuntuBold:bold:size=11}${color4}Networking ${color2}${hr 2}${font}
${if_existing /proc/net/route wlan0}${color1}Ip ${color}${alignr}${addr wlan0}
${color1}AP ${color}${alignr}${wireless_essid wlan0}
${color1}Signal ${color}${alignr}${wireless_link_qual_perc wlan0}${wireless_link_bar 10,100 wlan0}
${color1}Download ${alignr}${color}${downspeed wlan0}${downspeedgraph wlan0 10,100}
${color1}Upload ${alignr}${color}${upspeed wlan0}${upspeedgraph wlan0 10,100}
${color1}Total Down/Up ${alignr}${color}${totaldown wlan0}${color1}/${color}${totalup wlan0}
${else}${if_existing /proc/net/route eth0}${color1}Ip ${color}${alignr}${addr eth0}
${color1}Download ${alignr}${color}${downspeed eth0}${downspeedgraph eth0 10,100}
${color1}Upload ${alignr}${color}${upspeed eth0}${upspeedgraph eth0 10,100}
${color1}Total Down/Up ${alignr}${color}${totaldown eth0}${color1}/${color}${totalup eth0}${endif}${endif}
${font UbuntuBold:bold:size=11}${color4}Weather ${color2}${hr 2}${font}
${color1}Temperature ${alignr}${color}${weather https://tgftp.nws.noaa.gov/data/observations/metar/stations/ YPAD temperature} C
${color1}Humidity ${alignr}${color}${weather https://tgftp.nws.noaa.gov/data/observations/metar/stations/ YPAD humidity} %
${color1}Weather ${alignr}${color}${weather https://tgftp.nws.noaa.gov/data/observations/metar/stations/ YPAD weather}
${font UbuntuBold:bold:size=11}${color4}Top Processes ${color2}${hr 2}${font}
${color1}${top name 1} 	${alignr}${color}${top cpu 1} ${top mem 1}
${color1}${top name 2} 	${alignr}${color}${top cpu 2} ${top mem 2}
${color1}${top name 3} 	${alignr}${color}${top cpu 3} ${top mem 3}
${color1}${top name 4} 	${alignr}${color}${top cpu 4} ${top mem 4}
${color1}${top name 5} 	${alignr}${color}${top cpu 5} ${top mem 5}
Note: if you want to use this config file you want to at least change the METAR code (YPAD in my case) with one closer to you – see http://www.rap.ucar.edu/weather/surface/stations.txt.
Installing Ubuntu on Toshiba Z930 Ultrabook
Since I have been really happy with the performance and mobility on the Toshiba Ultrabooks (see previous blog entries) I have now chosen to stay with a tried brand and uprgrade to the Z930 i7 model.
Unfortunately this now comes with added hurdles by our good friends at Microsoft in the form of UEFI and the pre-installed disaster that is Windows 8. Instead of totally wiping the system as I did with the Z830 model I decided to install next to Windows 8 as lots of people have reported problems with the UEFI bootloader and the BIOS if you start messing with the pre-installed partitions (specially the EFI partition).
Using TOR and PRIVOXY on Ubuntu
This covers only the basic install and configuration for future reference. More info on Privoxy can be found on their website http://www.privoxy.org/.
Install
apt-get install tor privoxy
vim /etc/privoxy/config
uncomment the following line:
forward-socks5 / 127.0.0.1:9050 .
If you need to browse internal hosts while connected:
forward 10.*.*.*/
Browser Configuration
Firefox: FoxyProxy
Chromium: Proxy Switchy
Documentation: http://www.privoxy.org/faq/misc.html#TOR
FreedomBox + RaspberryPi = FreedomPi
I have been watching progress on FreedomBox ever since watching a video of Eben Moglen a few years ago.
Turns out that that they recently announced the availability of their 0.1 preview release. As part of this there is one component that is extremely useful for RaspberryPi users (funnily the co-founder of RasperryPi is also called Eblen by first name – go figure) out there concerned about increasing snooping of private information by governments and corporations for a variety of reasons.
OpenVPN - forward all client traffic through tunnel using UFW
By default OpenVPN only routes traffic to and from the OpenVPN Server. If you need all traffic from a client through the OpenVPN tunnel there are several options listed in the OpenVPN docs (http://openvpn.net/index.php/open-source/documentation/howto.html#redirect). Since I don’t have any control over the server in some cases I needed a client side solution. As I already have ufw running with Ubuntu I wanted to use the existing software.
Here is how to configure ufw to enable routing all traffic from your client machines through the OpenVPN Server.