Installing Ubuntu Phone (Touch) on Nexus 7 LTE
[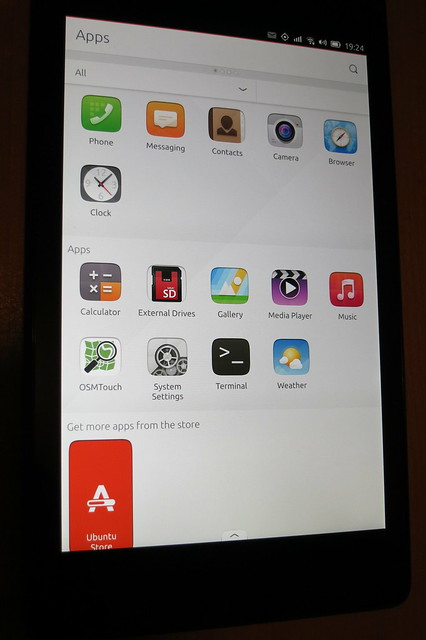 ](https://www.flickr.com/photos/leogaggl/16898140083 “ubuntu phone by Leo Gaggl, on Flickr”)
Add SDK repository
sudo add-apt-repository ppa:ubuntu-sdk-team/ppa
sudo apt-get update sudo apt-get install ubuntu-device-flash`
Enable USB Debugging on the device
- Make sure you have developer mode enabled (see http://developer.android.com/tools/device.html if you are unsure).
- Navigate to Settings > Developer options
- Enable USB Debugging. When a device is connected, you will be prompted in Android to authorize it.
Unlock Bootloader
adb reboot bootloader
fastboot oem unlock fastboot reboot`
CyanogenMod 12 on Sony Xperia Z2
Just a quick update of the previous article on “Sony Xperia Z2 upgrading to CyanogenMod 11“.
One thing is that CM now included the custom recovery and you do not need to download any other custom recoveries !
Download the CM 12 ZIP file for Sony Xperia Z2 (sirius) and extract the ‘boot.img’ file
Download link: https://download.cyanogenmod.org/?device=sirius
Get the device into fastboot (bootloader mode)
Vodafone LTE mobile data on Cyanogen Mod
I have had some issues recently with getting LTE (4G) connectivity on the Vodafone Australia Network using CyanogenMod 11 on multiple devices (http://forum.cyanogenmod.org/topic/92919-no-4g-signal-on-vodafone-au/). Turns out that it was an APN issue after all.
The APN provisioned by default when the Voda SIM card is inserted (vfinternet.au) does not work for the LTE Data Network. It works with GPRS & WCDMA, but fails to connect when the phone is set to prefer LTE (4G) Networks and they are actually available. It means that the handset will loose mobile data connectivity altogether. There are various APN Settings floating around on the interwebs, but any I tried previously did not fix the issue.
Sony Xperia Z2 upgrading to CyanogenMod 11
Contrary to my normal inclinations not to buy anything but Stock Android phones I ended up with a Sony Xperia Z2 in a hurry over the weekend (it’s a long story…). It appears to be quite a decent handset (with a pretty good camera actually) and one of the main reason to choose this over the other options was that is was one of the few high-end devices which already had a CM snapshot rather than just nightly releases. However similar to their colleagues at Samsung the Sony people also opted to stuff all sorts of crap-ware bloat onto the Android base OS. It appears not to be as bad as the Samsung (who are the kings of crap) mods, but for somebody used to the clean Android experience it’s just very annoying. So I opted to flash it straight to CyanogenMod.
Finding a private location check-in service
Foursquare decided that it was too hard for them to compete with location services like Yelp and split their app into two separate apps. Whilst that might make sense to the 4Square CEO and his VC masters, it makes no sense from a users perspective. Foursquare can be a bit of a battery hog already, and having 2 apps to open and “annoy” you with notifications is not an improvement by any means. And if I wanted Foursquare to be Yelp – I would have used Yelp in the first place. So no – I do not want to install another separate check-in App (called Swarm). One battery hogging location app was enough.
Upgrading Nokia X to CyanogenMod 11 (via Ubuntu)
The Nokia X seems to be a nice piece of hardware for just around $125 AUD. Nothing spectacular in terms of computing power, but much better build quality than your average cheap Chinese Android clone. I have always been a fan of Nokia hardware until they decided to commit suicide by firstly adding CEO Stephen Elop and ditching all of their software for Windows Mobile.
The problem with the device out of the box is that is has a horribly butchered version of Android. And by horribly I mean way worse than the usual bloat and crapware that poor Samsung, HTC or Sony users are normally subjected to. Hopefully this is only Nokia’s first step to a more open platform, but I wouldn’t hold my breath on that one.
Upgrade Rikomagic MK902 Android MiniPC from Ubuntu
If there would be an Oscar for the WORST firmware upgrade procedure (and associated drivers, documentation and general quality of software) Rikomagic should win this by a country mile !
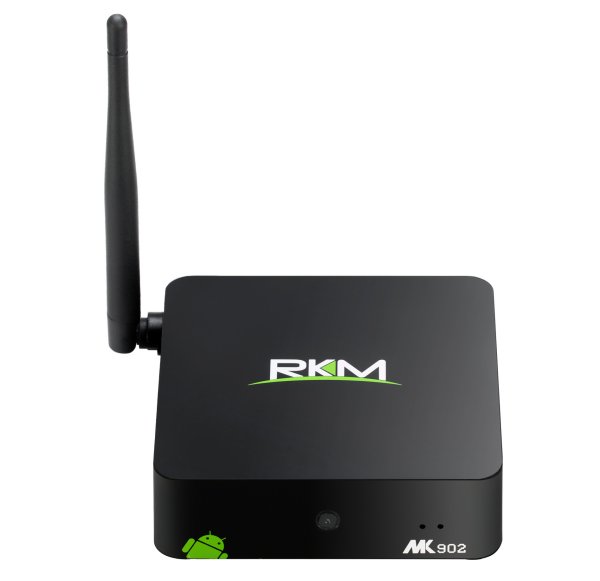
Since all the information I found on the interwebs said Linux was not supported I ended up borrowing friends notebooks (as I don’t own any Windows machinery anymore). My main Toshiba Ultrabook seemed to have issues with picking up the USB from a Windows Virtual Machine). After not being able to get the absolute crap USB drivers that come with the firmware download with any of the machines (Vista & Win7_64) I was ready to throw in the towel and put the purchase of this unit (in hindsight I would not do it again anyway) down as a total waste.
Android SDK issues on Ubuntu 14.04 64bit
Since the upgrade to Ubuntu 14.04 (Trusty Tahr) I have had issues running the Android SDK Tools. For example this error:
./adb
bash: ./adb: No such file or directory
Check the multi-arch architectures installed on the system.
sudo dpkg --print-architecture
Mine only showed ‘amd64’. Turns out you need to add the i386 architecture and install libc6:i386,libncurses5:i386,libstdc++6:i386 library packages.
sudo dpkg --add-architecture i386
sudo apt-get update
sudo apt-get install libc6:i386 libncurses5:i386 libstdc++6:i386
sudo ./adb
Synology OpenVPN connection from Android
Connecting securely to your home network has always been a bit of a challenge since common home ADSL routers not normally contain any VPN Servers (those which do contain such are generally PPTP servers which I would hardly call secure these days). Which is probably a good thing as they would be horribly out of date considering the firmware release policies of retail router manufacturers. You could run/maintain your own dedicated server, but for most home networks that is overkill and out of the technical depth of most hobbyists. However NAS Appliances are becoming more useful in home networks for storage and other common tasks. I have had good experiences with Synology NAS devices over a number of years and the latest iteration also has a very useful VPN Server package available based on OpenVPN (as most Synology Apps are common Open Source components).
Connection Android 4.x MTP mass storage to Ubuntu 12.x
The ability to connect Android 4.+ devices to Ubuntu using the USB Mass Storage interface has always been a pain. With Ubuntu 13.04 a new MTP back-end (gvfs-mtp) is going to be introduced, but I have had some issues with the 13.04 Beta so I found this backport PPA to Ubuntu 12.04 and 12.10
sudo add-apt-repository ppa:langdalepl/gvfs-mtp
sudo apt-get update
sudo apt-get install gvfs
sudo apt-get upgrade
Kudos to Phillip Langdale for the work and maintaining the PPA !
Running Android 4.0 (ICS) on Virtualbox
Debugging things on the Android Emulator (incluced in the SDK) can be a very slow and cumbersome process. Thanks to the Android-x86 Project it’s quite easy to run Android in VirtualBox. This is highly useful when you need to test mobile apps and websites from the Android Browser (as well as Chrome Mobile).
- Download an Ethernet enabled ISO from Tablets x86
wget http://dl.dropbox.com/u/75945873/android-x86-4.0-eth0-generic_x86-20120426.iso.torrent
transmission android-x86-4.0-eth0-generic_x86-20120426.iso.torrent
- Create new ViratualBox VM


Important Settings (see screenshots)- OS: Linux, Version: Linux 2.6
- Enable VTx/AMD-V
- Use Bridged Network Adapter (if you want to allow direct Internet Access)
- Mount the ISO file downloaded previosly and start the VM

- Create the Root Filesystem (ext3) on the VBox .vdi created with the new VM, mark as bootable
- Write the Filesystem changes to disk (VDI) and format the disk
- Install GRUB Boatloader
- Copy files from ISO to VDI
- Unmount the ISO image and reboot Note: You need to disable the mouse pointer integration (if you have installed VirtualBox Client Add-ons) in the menu of Virtualbox (‘Machine’ –> ‘Disable Mouse Integration’) when you start the VM (see screenshot). I have not found a way to disable this by default on Virtualbox on Ubuntu (If anybody has managed this I would love to know how !)


Android 4.0 screenshot functionality on Galaxy Nexus
One of the features I missed since the good old Android 1.5 days was the ability to take screen-shots on the device. Prior to Android 4 (ICS) the only workable way to create screen-shots was to connect via USB cable and use the Android SDK to make remote screen-shots.
 On Android 4.0 all you have to do is press Volume Down Key + Power Key down at the same time and hold. You should hear the camera click (if audio is on) and Android will show a notification that the screenshot was saved on your device and you can now upload or transfer to your favourite service.